Step-by-Step Guide: Installing a Through the Wall Air Conditioner Sleeve Like a Pro
Summer is upon us, and the rising temperatures necessitate the installation of an air conditioner. If you’re looking for a more permanent solution that eliminates the need to haul your AC unit in and out each time summer rolls around, then a through-the-wall air conditioner sleeve is exactly what you need.
Installing one yourself may be daunting at first, but with our step-by-step guide, you can do it like a pro in no time. This guide will cover everything from choosing the right size sleeve for your unit to cutting through walls and sealing up any gaps to ensure maximum efficiency. So buckle up and let’s dive into this exciting project!
Choosing the Right Size Sleeve for Your AC Unit
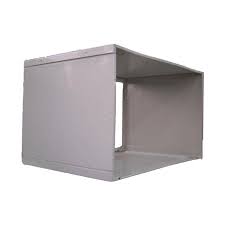
Choosing the right size sleeve for your AC unit is crucial to ensure that it fits snugly into your wall and operates efficiently. Before purchasing a sleeve, measure the dimensions of both your AC unit and the hole in which you plan to place it. The sleeve should be slightly bigger than the AC unit but small enough to fit securely inside the wall opening.
If you’re uncertain about sizing, check with the manufacturer’s recommendations or consult an HVAC professional for guidance. Choosing a size too big may result in air leaks that decrease efficiency while selecting one too small can cause problems with installation and operation. By taking necessary measurements beforehand, you can save time and money by avoiding complications during installation.
Overall, proper planning is key when installing through-the-wall air conditioner sleeves. Selecting the right size ensures optimal performance while maintaining energy efficiency without compromising on quality and effectiveness of cooling during peak summer temperatures in your home!
Preparing the Installation Site: Tools and Materials You’ll Need
Before beginning the installation of a through-the-wall air conditioner sleeve, it’s essential to gather the necessary tools and materials. You’ll need measuring tape, a marker or pencil, a level, an electric drill with hole saw attachment or reciprocating saw for cutting through walls; gloves and safety goggles are also recommended for protection during these tasks. Wall repair supplies such as putty knives, drywall screws & anchors, joint sealant or patching material will be needed if any adjustments are made after installing.
Once you have all your tools together take some time to prepare the site for installation by removing anything that might obstruct access; clear away debris around the opening in both sides of the wall. Ensure that utilities like pipes and wiring are out of harm’s way before starting work on electrical features as well: beware live wires! Finally there needs to be enough space available surrounding outlets where power cords will plug into–there should not be any obstructions here either. With adequate preparation combining safety precautions & sufficient working room once things get underway you can install efficient cooling capacity into your home!
Cutting Through Walls: Tips and Techniques
The installation of a through-the-wall air conditioner sleeve may seem intimidating, but with the right tips and techniques, it can be done like a pro. The first step is to choose the right size sleeve for your unit. Measure both the width and height of your air conditioner before purchasing to ensure that you get the correct fit.
Next comes the challenging part: cutting through walls. It’s essential to use caution while doing this step, as it involves working with power saws or cutters. Make sure you have all necessary safety equipment in place before starting. Once you’ve cut through, seal up any gaps thoroughly using weather-stripping foam, caulk, or other sealing materials to prevent leaks and maximize efficiency.
Overall installing a do-it-yourself wall-mounted AC system has its benefits such as reduce noise pollution compared to window units but ensuring an efficient system overall should be top priority when deciding if it is worth the investment upfront.
Installing the Sleeve: Step-by-Step Instructions
Summer can be unbearable without a proper air conditioner to keep you cool. Installing a through-the-wall air conditioner sleeve may seem daunting at first, but with our step-by-step instructions, it can be done easily and efficiently. The first step is selecting the right size sleeve for your unit. Measure your existing AC unit carefully and choose a sleeve that fits snugly around it.
Next up is cutting through the wall to create an opening for the sleeve. This should only be attempted if you are experienced with power tools or have hired a professional handyman. Use caution when making sure there are no electrical wires or plumbing in the way before cutting into walls. Once you have created an opening, secure the sleeve firmly in place using screws or brackets provided by manufacturer’s instructions and seal any gaps around edges with caulk to ensure maximum efficiency of cooling system operation. With these easy steps outlined in this guide, installing an air conditioning unit has never been easier!
Sealing the Sleeve: Ensuring Maximum Efficiency
Sealing the sleeve is a crucial step in ensuring maximum efficiency when installing a through-the-wall air conditioner unit. Gaps or spaces between the sleeve and wall can lead to significant heat loss, causing your AC system to work harder than necessary and ultimately driving up energy costs. Properly sealing the sleeve requires filling any gaps with insulation foam or caulking material and double-checking that all screws are tightly secured.
To further improve efficiency, it’s essential to choose an appropriately sized sleeve for your unit based on its BTU output. A too-small sleeve can cause airflow restrictions and reduce cooling performance, while a too-large one may create unnecessary drafts or leakages of cool air into unoccupied areas. Following these tips will not only help save money in energy bills but also increase the longevity of your AC system by reducing workload stress over time. Get started today and enjoy cooler indoor air during those hot summer months!
Testing and Operating Your Through-the-Wall Air Conditioner
Testing and operating your through-the-wall air conditioner is crucial to ensure that it runs efficiently and effectively. Before starting the unit, always check if all important components such as the thermostat, fan motor, compressor, thermometer are functioning correctly. You can also test its cooling power by setting the thermostat at a temperature you feel comfortable with and observe how fast it cools down the room.
Once you’ve installed your sleeve and AC unit successfully, make sure that there’s enough clearance between both ends of the wall for proper ventilation flow. If your AC comes with an adjustable vent control switch or filter system, use them accordingly to maintain clean air circulation within your home environment.
Finally, regular maintenance is necessary to keep your through-the-wall air conditioner working optimally. This includes cleaning or changing filters frequently depending on personal usage demands while also ensuring that condensation does not build up in any area around where cool air escapes from the unite into your space.
Troubleshooting Common Installation Issues
Despite its benefits, installing a through-the-wall air conditioner sleeve can be challenging. However, most installation issues arise from a lack of proper planning and preparation. One common challenge is selecting the correct size sleeve for your unit. It’s important to measure the dimensions of both the AC unit and the wall opening accurately to avoid purchasing an incompatible product.
Another issue often encountered during installation is cutting through walls correctly. Cutting holes in masonry walls require specialized tools such as hammer drills or rotary hammers, which may not be readily available to homeowners. Improper drilling could also compromise wall structures or cause cracks that lead to unwanted leaks.
Sealing any gaps after installation is also crucial for maximum efficiency since they are prone to letting hot air escape while allowing cool air into unintended spaces that won’t benefit you directly.
Therefore, it’s essential to understand these common issues before embarking on such an installation project and taking all precautions accordingly.


One Comment